Modbus Kinder Morgan Configuration
- Michael Standal
- Emma Fullilove (Deactivated)
- kristina schaeffer (Unlicensed)
Device Tab
See the Common Modbus Device Tab page.
Time Sync Tab
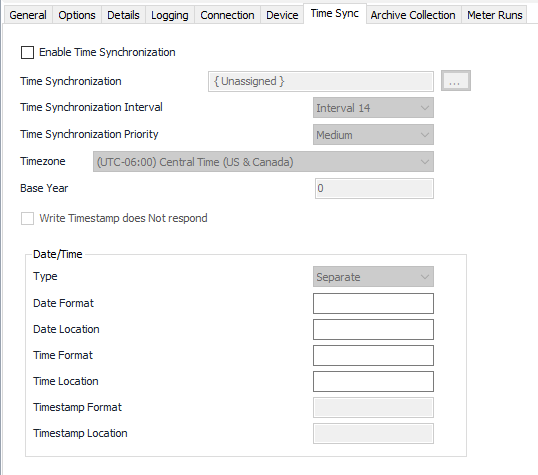
Enable Time Synchronization Through Timezone
See Common Time Sync Tab for general Time Sync configuration details.
Write Timestamp does Not respond
Default = Not selected. Select this if the device does not send a response or acknowledgment to a time sync command.
Date/Time Type
Select 'Separate' if date and time are addressed separately. Select 'Combined' if date and time are stored in one location.
Date Format
The format of the date value (example: YYMMDD).
Date Location
The I/O address in the device that contains the date.
Time Format
The format of the time value (example: HHMMSS).
Time Location
The I/O address in the device that contains the time.
Timestamp Format
Date/Time Format.
Timestamp Location
Modbus register for Date/Time.
Notes
If Date or Time are in separate 16 bit consecutive registers (Example:6101=Hour, 6102=Minute, 6103=Second), then Time Format would be “HHmmss”, and Time Location would be “6101[3]”.
If Date and Time are in combined type then the timestamp format could be “JULIAN” (seconds since midnight of 01/01/1970), “4BYTEDATE” (BSAP) or string (MMddyyHHmmss).
Archive Collection Tab
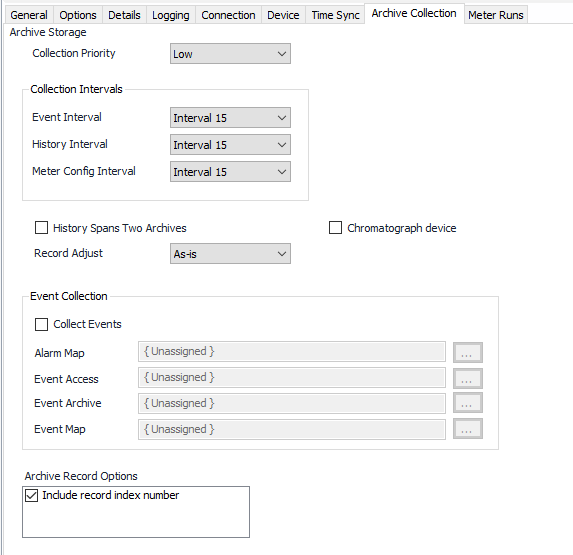
Collection Priority
- Low (Default).Queues up with other Low priority items.
- Medium. Interrupts Low priority items, and queues up with other Medium priority items.
- High. Interrupts Medium and Low priority items, and queues up with other High priority items.
Collection Intervals
Select the desired Interval relating to the Schedule object assigned on the Connection tab. History record collection will occur at a frequency based on the configuration of this interval.
Note
If multiple schedule objects are selected for this device (Primary, Secondary, or Alternate), ensure that each Schedule has the same interval numbers configured.
History Spans Two Archives
Default = Not selected. Select this option if this device splits each meter's history across two archives (e.g. 701 and 702)
Record Adjust
Default = "As-is". Select "As- is" to publish records with data as it comes from the device. Select "Start of interval" to combine two records into one record with correct hourly values (instead of accumulations).
Chromatograph device
Default = Not selected. Select if this device is a chromatograph which uses a history pointer that wraps back to one after it reaches 9999.
Check Collect Events if required.
Alarm Map
Click  to select or create an EFM Alarm Configuration. See the EFM Alarm Configuration section for more details.
Event Access
Click to select or create an Archive Access. See the Archive Access section for more details.
Event Archive
Click to select or create a Configurable Archive. See the Configurable Archive section for more details.
Event Map
Click to select or create an EFM Event Configuration. See the EFM Event Configuration section for more details.
Include record index number
Default = Not selected. Select to include the record index number.
Meter Runs Tab
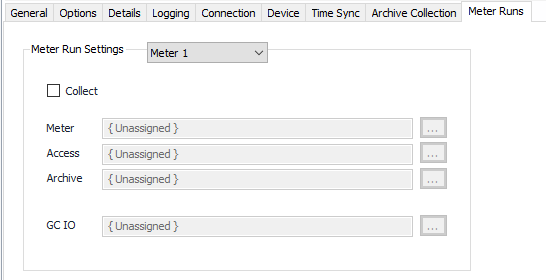
Meter Run Settings 1-12
Collect
Default = Not selected. Select to configure the meter collection.
Meter
Click to select or create the Meter Object assigned to selected meter run number. See the Meter section for more details.
Access
Click to select or create a Archive Access. See the Archive Access section for more details.
Archive
Click to select or create a Configurable Archive. See the Configurable Archive section for more details.
GC IO
Click to select or create the GC object that is configured with IO addresses for gas component data. See the Gas Chromatograph section for more details.
Related content
For assistance, please submit a ticket via our Support Portal, email autosol.support@autosoln.com or call 281.286.6017 to speak to a support team member.