SCANCOM Configuration
- Michael Standal
- Emma Fullilove (Deactivated)
- kristina schaeffer (Unlicensed)
Recommended Configuration Steps
The following steps are recommended by AutoSol:
Step 1 - Gather Device Information
Determine the model number and communication parameters used by the device. Make note of the network path used and if Serial or TCP communications will be used to interface with ACM.
Step 2 - Device Tab
Complete the settings on the Device Tab covered on this page.
Step 3 - Connection Tab
Complete the configuration for the Connection Tab. At a minimum, the Connection Port object must be assigned and configured correctly. Make sure the Port object is enabled.
Step 4 - Test Communication
At this point the communication path can be tested to ensure ACM can communicate with the end device. Using the Commands tab, select and execute the Test Communication command and note the results in the ACM Log Viewer. This test will not perform a security login, so this must still be resolved in the next step.
Step 5 - Configure Security
Complete the Security Tab configuration covered on this page.
Step 6 - Browse OPC Items
Using an OPC client, browse a common OPC item such as Board_ID and ensure the value comes in. If the value does not come in, ensure the previous steps are correct.
Final Steps
Configure any EFM collection, Time Sync and Schedule objects needed.
Device Tab
Notes
SCANCOM is a serial protocol. The address and Id properties on the Device Tab must be configured to match the communication channel being used on the device regardless if Serial or TCP-based communications are configured in ACM. In most cases, these settings are shown on the device in a repeating manner.

Adept Message Format
The format type configured in the device's communication settings (ScanWin).
- Adept 3.4
- Adept 4.0 (Default)
Device Type
The device type. Determines what OPC items are available to clients.
- Scanner 1130
- Scanner 1131 (Default)
- Scanner 1140
Drop Address (DLC Link)
Default = 1. The device address assigned in the device's communications settings (ScanWin).
Preamble Attempts (DLC Link)
Default = 5. The number of SNRM preamble attempts to use when establishing a link. This number can be increased to allow more time to establish the DLC link portion of the communication exchange. This can trigger the device to wake up from a power reserve mode if used.
Ack Attempts (DLC Link)
Default = 10. This setting adjusts the number of times ACM will send a DLC RR packet to the device after sending a request for information. Raising this value gives the device more chances to respond to a request before ACM marks the attempt incomplete.
Ack Delay (DLC Link)
Default = 100. Time in milliseconds to wait before sending each DLC RR packet to the device after sending a request for information. Raising this value gives the device more time to complete a request without interruption. This setting can be used to "tune" the response time such that the device has ample time to process and respond to a request but not be waiting to send the response back to ACM if the value is too high. AutoSol recommends making small adjustments to this value (50-100ms at a time) while monitoring performance.
Host Application Address (ACM)
Default = 4096. The host address assigned in the device's communications settings (ScanWin).
Device Application Address
Default = 4096. The device address assigned in the device's communications settings (ScanWin).
Note
The Host and Device Application Address will typically be the same.
Device Network Id
Default = 2. The Adept4 source network id assigned in the device's communications settings (ScanWin).
Node Name
Optional. This property is used to resolve the device configuration on SCM import files.
Station Number
Optional. This property is used to resolve the device configuration on SCM import files.
Enable Enhanced Logging Mode
Default = Not selected. Select this option to have the protocol log additional information about incoming and outgoing messages and troubleshooting data.
Caution
Leaving this option on for extended periods of time can result in a large volume of log entries. This option is only recommended for short periods of time as to gather data for troubleshooting.
Enable Adept Pass-Through Mode
Default = Not selected. Depreciated, no longer used.
Enable Clear Buffer Mode
Default = Not selected. Depreciated, no longer used.
Send Meter Configuration Requests Immediately
Default = Not selected. If selected, executes the command request for a meter configuration immediately instead of waiting till the next scheduled historical collection.
Disallow GCWrite Partial Errors
Default = Not selected. If selected, will mark a GC write attempt as a failure (all worked or nothing) if the device reports one or more items as failed in the response.
Time Sync Tab
See the Common Time Sync Tab page.
Archive Collection Tab
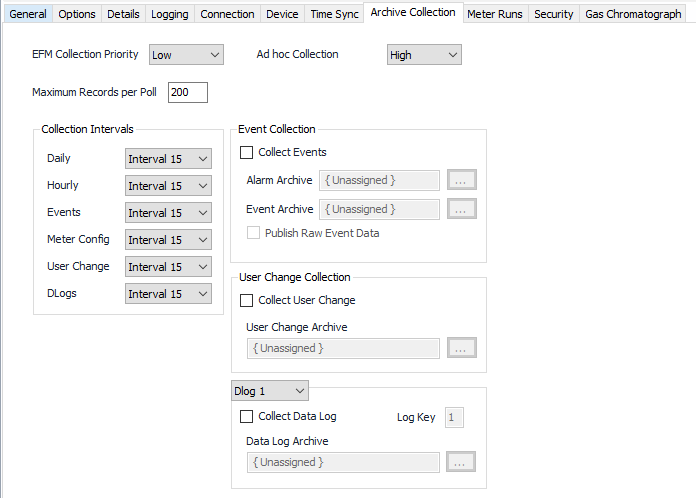
EFM Collection Priority
The priority to use for scheduled EFM history collection.
- Low (Default).Queues up with other Low priority items.
- Medium. Interrupts Low priority items, and queues up with other Medium priority items.
- High. Interrupts Medium and Low priority items, and queues up with other High priority items.
Ad hoc Collection Priority
The priority to use for ad hoc history collection.
- Low.Queues up with other Low priority items.
- Medium. Interrupts Low priority items, and queues up with other Medium priority items.
- High (Default). Interrupts Medium and Low priority items, and queues up with other High priority items.
Maximum Records per Poll
Default = 200. Overall maximum number of records to poll during a history collection task.
Collection Intervals
Select the desired Intervals relating to the Schedule object assigned on the Connection tab.
If multiple schedule objects are selected for this device (Primary, Secondary, or Alternate), ensure that each schedule has the same interval numbers configured. For all Configurable Archive objects, the Field Configuration selection should be left Unassigned.
Collect Events
Default = Not selected. Select to configure and collect event records. Event and Alarm records are collected together but archived separately.
Event/Alarm Archive
Click to select or create a Configurable Archive. See the Configurable Archive section for more details.
Publish Raw Event Data
Default = Not selected. Select this to include the raw event message byte traffic as part of the record data sent to the publisher.
Collect User Change
Default = Not selected. Select to configure and collect user change log records.
User Change Archive
Click to select or create a Configurable Archive. See the Configurable Archive section for more details.
Dlog 1-4
Selects the Dlog to configure for collection.
Collect Data Log
Default = Not Selected. Select to configure and collect data log records.
Log Key
Default = Selected Dlog. This number corresponds to the configured Dlog number in the device.
Data Log Archive
Click to select or create a Configurable Archive. See the Configurable Archive section for more details.
Meter Runs Tab
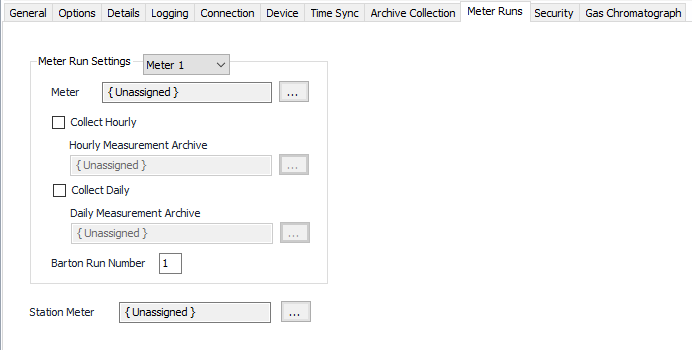
Meter Run Settings 1-6
Selects the meter run to configure for collection.
Meter
Meter Object assigned to this meter run number.
Click to select or create one. See the Meter section for more details.
Collect Hourly
Default = Not selected. Select to configure and collect hourly records for the selected meter run.
Hourly Measurement Archive
Click to select or create a Configurable Archive. See the Configurable Archive section for more details.
Collect Daily
Default = Not selected. Select to configure and collect daily records for the selected meter run.
Daily Measurement Archive
Click to select or create a Configurable Archive. See the Configurable Archive section for more details.
Barton Run Number
Default = Meter Run Number Selected. The Barton Run Number (configured in the device for a given flow run) to use when accessing this meter number.
Example: Meter 1 (Barton Run Number= 9) in ACM may be configured here to access a meter run configured in the device numbered 9.
Station Meter
Click to select or create the Meter Object assigned to the station. The station meter is used to roll up alarms and events not mapped to a specific meter run for publishing. See the Meter section for more details.
Security Tab
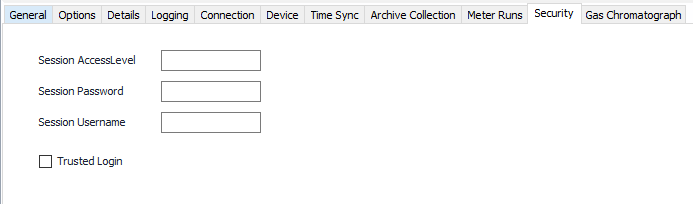
Session Access Level
The session access level to use when logging in to the device.
Session Password
The session password to use when logging in to the device.
Session Username
The session id/name to use when logging in to the device.
Trusted Login
Default = Not selected. Select to use trusted login. Trusted login bypasses login and logout steps normally performed during a poll cycle.
Trusted Login Configuration
Gas Chromatograph Tab

Demand GC Archive
This archive is used to publish GC data collected by issuing a write to the DemandGCUpload OPC item.
Click to select or create a Configurable Archive. See the Configurable Archive section for more details.
Related content
For assistance, please submit a ticket via our Support Portal, email autosol.support@autosoln.com or call 281.286.6017 to speak to a support team member.