Honeywell® Mercury Configuration_Archive
- Alex Mouton
- Emma Fullilove (Deactivated)
- kristina schaeffer (Unlicensed)
Recommended Configuration Steps
General Tab
See the General Object Configuration page.
Options Tab
See the Device Object General Options page.
Details Tab
See the Device Object General Details page.
Logging Tab
See the Device Object General Logging page.
Connection Tab
See the Device Object General Connection/Schedule page.
Device Tab
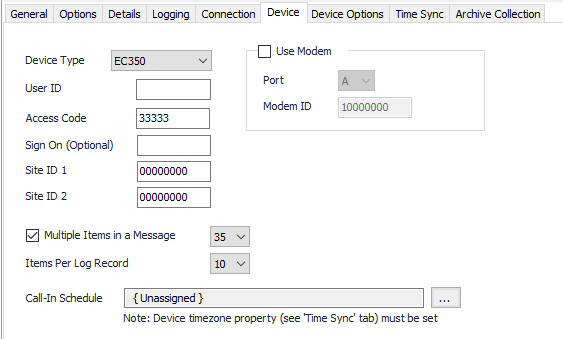
Device Type
- ECAT (Default)
- ER
- MiniAT
- MiniMax
- Pulse Accum
- ERX
- Turbo C
- EC350
- ERX350 (ER350)
User ID
Default = blank. The two digit user ID to use for secure sign-on. Only valid on 350 series devices. Leave blank to use non-secure sign-on command.
Access Code
Default = 33333. The five digit instrument access code (password) for the device.
Sign On
The device sign-on code is optional. If left blank, ACM will negotiate the correct code to use with the device automatically based on the configured device type.
Site ID 1
Default = 00000000. Site ID 1 of 2 to provide verification/identify of which Mercury device to communicate with.
Site ID 2
Default = 00000000. Site ID 2 of 2 to provide verification/identify of which Mercury device to communicate with.
Use Modem
Default = Not selected. If the Honeywell Mercury device is communicating through an MI Modem then select this and enter the Port letter and the MI Modem ID for that device.
When doing cry-outs, set the MI modem port in the drop down list to the one the Honeywell Mercury device is attached to. This option is only relevant for processing unsolicited messages and will not matter when simply polling through an MI modem.
Port
Default = A. Mercury Modem Port Number.
Modem ID
Default = 10000000. Mercury Modem ID Number.
Multiple Items in a Message
Default = Selected. Select this if the device can support RG messages and set the maximum number of items desired to be read per poll message.
Items Per Log Record
This is the number of audit items that the Mercury device model uses in an audit log record. This is firmware version dependent and not all devices are capable of using all of the selections. This option is not used for 350 series devices.
- 1 ~ 9
- 10 (Default)
- 11 ~ 12
- 20
Call-In Schedule
Click  to select or create the Call-In Object assigned to this device. See the Mercury Callin Scheduler section for more details.
Device Options Tab
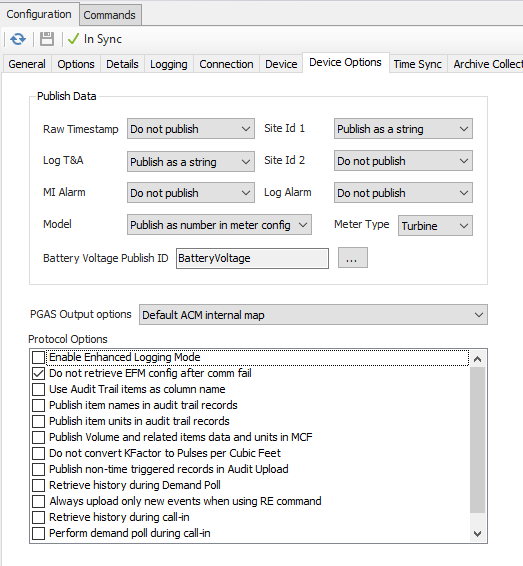
Publish Data
Settings that determine how or if certain field values will be included in the historical publish data. Archive collection must be enabled, on the Archive Collection tab, for these settings to take effect.
Raw Timestamp
Publish the raw record timestamp.
- Do not publish (Default)
- Publish as a number
- Publish as a string
Log T&A
Publish the audit record log trigger and alarm field.
- Do not publish
- Publish as a number
- Publish as a string (Default)
MI Alarm
Publish MI alarm status condition during modem inquiry.
- Do not publish (Default)
- Always publish
- Only publish on alarm
Model
Publish instrument type.
- Do not publish (Default)
- Publish as a string in audit history
- Publish as a string in meter config
- Publish as a number in audit history
- Publish as a number in meter config
Site Id 1
Exclude this field in the published output, or publish the value as a string or as an integer.
- Do not publish
- Publish as a number
- Publish as a string (Default)
Site Id 2
Exclude this field in the published output, or publish the value as a string or as an integer.
- Do not publish (Default)
- Publish as a number
- Publish as a string
Log Alarm
Publish the audit record alarm field, without the log trigger value. Non-350 series devices only.
- Do not publish (Default)
- Publish as a number
- Publish as a string
Meter Type
- Orifice
- Positive
- Turbine (Default)
- UltraSonic
- Liquid
Battery Voltage Publish Id
Default = BatteryVoltage. Click to select the identifier to use when publishing the battery voltage. This property is for backward compatibility and may be deprecated in future releases.
PGAS Output options
PGAS report publish options for certain audit record fields.
- Default ACM internal map (Default)
- Map Int Uncorr Vol to Index Off and Uncorr Vol, put '0' in Index On
- Map Total Vol to Index Off and Uncorr Vol, put '*'in Index On
- Map Total Uncorr Vol to Index Off and Uncorr Vol, put '*'in Index On
Protocol Options
Enable Enhanced Logging Mode
Default = Not Selected. This prints very verbose messages in the ACM log about the current state of the protocol engine and/or EFM upload.
Do not retrieve EFM meter configuration after communications failure
Default = Selected. When not selected, ACM will poll for meter configuration data after a communication failure.
Use audit trail items in column names
Default = Not selected. Publish the audit trail item as column names in CSV report.
Publish item names in audit trail records
Default = Not selected. This option will produce an extra column for each audit trail item with the current audit trail item number.
Publish item units in audit trail records
Default = Not selected. This option will produce an extra column for each audit trail item with the current unit used for that audit trail item, if known.
Publish Volume and related items data and Units in MCF
Default = Not selected. This option changes the units of some published items.
Do not convert KFactor to Pulses per Cubic Feet
Default = Not selected. By default, ACM will convert the KFactor value from Pulses per Cubic Meters to Pulses per Cubic Feet. Enable this option to publish the KFactor in Pulses per Cubic Meter when the field device is using Pulses per Cubic Meter units.
Publish non-time triggered records in audit upload
Default = Not selected. This option will cause history records generated by events or alarms to be published along with time triggered ones.
Retrieve history during Demand Poll
Default = Not selected. This option will initiate a history upload after a user initiated demand poll completes.
Always upload only new events when using RE command
Default = Not selected. This option prevents uploading all events from the device queue if the event pointer is reset or on the first upload of a newly created device.
Retrieve history on call-in
Default = Not selected. This will automatically retrieve audit history on receiving an unsolicited message.
Perform demand on call-in
Default = Not selected. This will automatically execute a demand poll on any advised items upon receiving an unsolicited message.
Set Call-in Schedule after regular polls
Default = Not Selected. This will write the next call in time, based upon the configured Call-In Schedule object, to the device after a scheduled poll completes.
Time Sync Tab
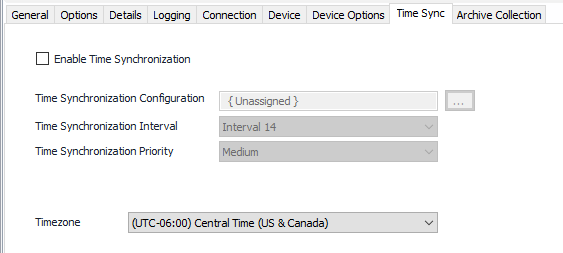
Enable Time Synchronization
Default = Not selected. Select this to configure and allow requests to be made.
Time Synchronization Configuration
Click to select or create the Connection Object assigned to this device. See the Time Synchronization section for more details.
Time Synchronization Interval
Select the desired Time Synchronization Interval relating to the Schedule object assigned on the Connection tab. Time Synchronization checks occur on the frequency of this interval.
Time Synchronization Priority
- Low. Queues up with other Low priority items.
- Medium (Default). Interrupts Low priority items, and queues up with other Medium priority items.
- High. Interrupts Medium and Low priority items, and queues up with other High priority items.
Timezone
Default = UTC-06:00 Central Time (US & Canada).
Archive Collection Tab
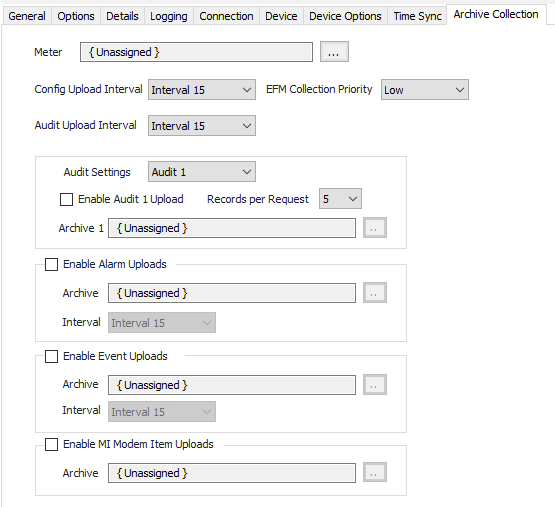
Meter
Click to select or create the Meter Object assigned to the meter. See the Meter section for more details.
Upload Intervals
Select the desired Meter Configuration, Audit, Alarm, and Event Interval relating to the Schedule object assigned on the Connection tab.
EFM Collection Priority
- Low (Default). Queues up with other Low priority items.
- Medium. Interrupts Low priority items, and queues up with other Medium priority items.
- High. Interrupts Medium and Low priority items, and queues up with other High priority items.
Audit Settings
Select to edit the settings for Audits 1 through 5.
Records per Request
Default = 5. Select the number of audit records to request per message. 350 series devices only.
Enable Audit/Alarm/Event Uploads
Default = Not selected. Select to enable and configure collection.
Enable MI Modem item uploads
Default = Not selected. Select to enable publishing MI modem alarm item values.
Archive
Click to select or create an Archive Limits object. See the Archive Limits section for more details.
Pulse Accumulator Tab
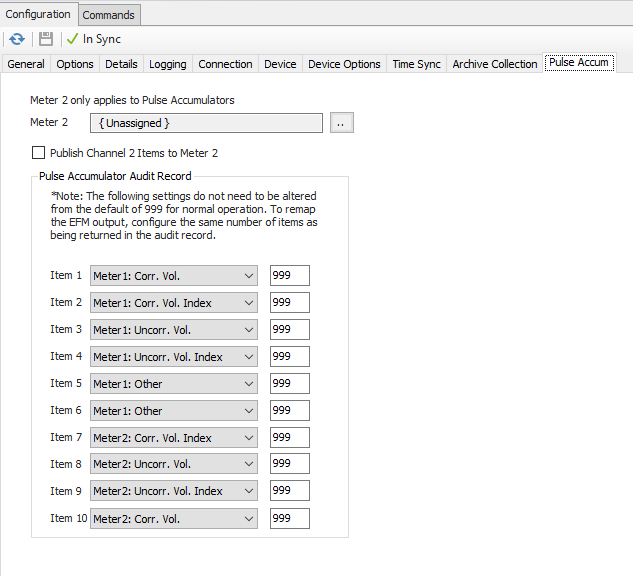
The Pulse Accumulator tab contains configuration options that only apply if the selected device type is a Pulse Accumulator.
Meter 2
Click to select or create the Meter Object assigned to the meter. See the Meter section for more details.
If a meter object is assigned as Meter 2 and all other controls on this tab are left at their default settings, all fields of the audit log record will be published to both Meter 1 and Meter 2.
Publish Channel 2 Items to Meter 2
Default = Not Selected. When enabled, items in the audit log record that are associated with Channel 2 in the field device will be published to Meter 2. All other items will publish to Meter 1.
Pulse Accumulator Audit Record
Default = 999, meaning not used. These properties are used to manually configure the audit log record and to which meter object the values in the record are to be published. These properties are only used if the above two publishing options do not meet your requirements. Starting with Item 1, and for each item in the audit record, select from the drop down control the associated EFM value. Enter the item number of the field in the edit box. To skip a field in the record and not publish it, enter '255' as the item address.
The Pulse Accumulator Audit Record properties have precedence over Publish Channel 2 Items to Meter 2 property. If items are configured to an address other than '999', the table will be used to remap the audit record output regardless of the state of Publish Channel 2 Items to Meter 2 property.
For assistance, please submit a ticket via our Support Portal, email autosol.support@autosoln.com or call 281.286.6017 to speak to a support team member.